Why Use Prioritization Helper?

Businesses need a fair and organized way to make large decisions that affect multiple stakeholders, but many run into deadlocks since judgments and opinions vary.

Prioritization Helper is broken up into three parts: Pairwise Comparisons, Matrix Scoring, and Value Scoring. Pairwise Comparisons are used for making critical business decisions that possibly need input from a lot of stakeholders. This would replace a traditional poll or in-person vote at a meeting. Matrix Scoring and Value Scoring are both used to prioritize Objects inside of Salesforce so all team members can efficiently attack their to-do lists while being on the same page

Pairwise Comparisons are used for a winner-take-all situation. There are many options, but only one choice will be decided. Some use cases include hiring a candidate from a group interview, software selection, or deciding what restaurant will cater a company event. More use case suggestions here.

This takes care of two types of opinions: importance of criteria (what Admin Ann finds important won’t always match Sales Sam or Finance Fran) and how well each option compares to the criteria.

To eliminate deadlocks, Prioritization Helper pairs criteria against each other for individuals to rate the importance of each. This way Finance Fran and Sales Sam are able to have their voices heard while contributing to the group decision.

But how is Prioritization Helper better than taking a vote? After all, wouldn’t it be faster and easier to send a poll to everyone? Truth is, people are imperfect beings. There are plenty of obstacles that get in the way of rational reasoning such as cognitive bias, sunk cost fallacy, or deciding with emotions and backing up with logic later.

While it’s possible to hold a vote for stakeholders, they might not make the most sound decision, or even pick the decision that truly holds all of their values. By relying on the Analytical Hierarchy Process (described below), it will do all of the calculations and work for you, ranking the most optimal choices for each individual. And the results may not always be what you’d expect if it was a simple poll where you input the answer.

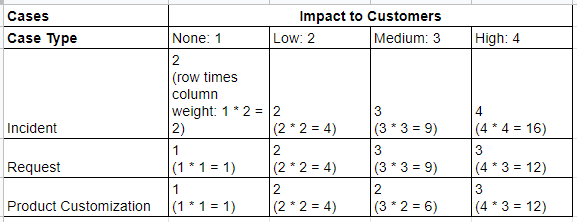
Matrix scoring is better used for individuals or groups to decide a priority scoring. Here all of the tasks or items will be completed, but it’s a matter of ranking from most to least important. Common use cases for this would be ranking bug fixes based on importance, or ordering marketing projects. More use case suggestions here. 

The ultimate product of a matrix scoring table is a Salesforce formula field, therefore it is always up to date with zero delays, can be used in reports, and does not require database updates. It is a stable, but less flexible, alternative to other processes such as Process Builder or custom apex code.

Building a formula field via a matrix provides a more straightforward visual input, which makes it easier to create formula fields for prioritization. It also ensures higher maintainability of the established fields, where shifting priorities can be easily projected to the formula field without diving into the formula code itself. Plus the clear presentation of the underlying prioritization system for each formula field makes it easier to communicate with those who are less familiar with coding. 

A matrix scoring field’s advantage over pairwise comparison is that one formula field can be applied to all records under an object. By defining a matrix once, all records of that object will have a priority score immediately, regardless of how many alternatives there are to prioritize, where as a pairwise comparison can only apply to a limited quantity of the alternatives and requires intensive manual input for each set of alternatives.

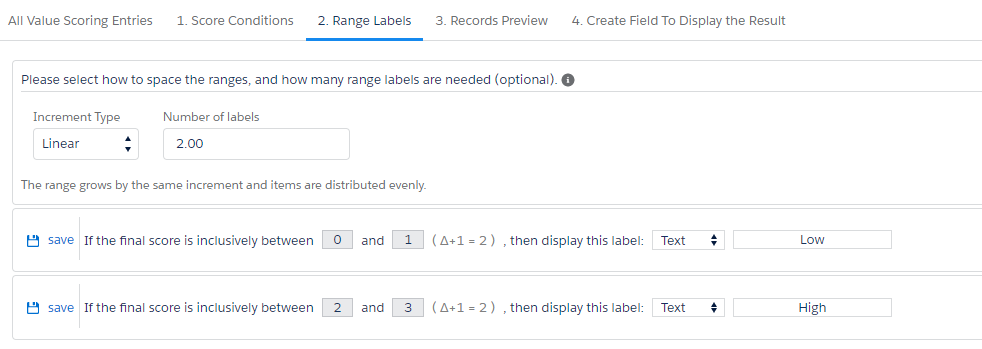
Value scoring is similar to matrix scoring as it will also decide priority scoring on Salesforce objects. It will also be up to date when entries get updated. Common use cases for this would be ranking bug fixes based on importance, or ordering marketing projects. More use case suggestions here.

Creating a value scoring entry is easier than a matrix as you only need to have one relevant field you are taking into consideration, whereas a matrix needs to have at least two. Different fields are then added together to get a final score. This will likely give you a smaller range of numbers since fields are getting added, rather than multiplied like in a matrix.

Pairwise Comparison Definitions

Analytic Hierarchy Process (AHP) - Analytic hierarchy process is a decision making method created by Thomas L. Saaty to organize complex decisions. AHP helps teams and individuals find the best solution to their problem with “a comprehensive and rational framework for structuring a decision problem, for representing and quantifying its elements, for relating those elements to overall goals, and for evaluating alternative solutions.

“What-if?” Analysis - When running the final results, you will have the option to conduct a “what-if” analysis. Here, you can exclude certain criteria that may no longer be relevant, or was deemed least important by everyone. This will re-calculate the results excluding the unchecked criteria, and final results may change based on this new information.

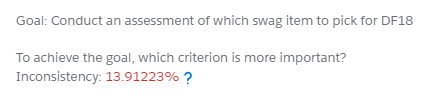
Inconsistency Rating - This percentage will show people’s biases or mistakes. The higher the percentage, the more their results don’t line up with each other. You should aim to have your score under 10%, however you can move on to the next step no matter what score you get. This just gives you a chance to go back and fix any mistakes, or think about your choices longer.

Inconsistency Rating Screenshot

Optional Prioritization Helper Components

We have two additional components you can add to Prioritization Helper. These components are provided with no additional charge, but you will need to have Prioritization Helper already installed for these components to work, and they will be disabled if your 14-day trial expires. 

  • Work.com component: This is a private listing to install. Along with Prioritization Helper, you also need to have the Workspace Command Center package.
    • The lightning component provides a list of tasks sorted by a configurable priority field.
      The default priority is provided by a matrix (Matrix Scoring) on the original Priority field and the Action Category field from the Workplace Command Center package. Both the prioritization method (Matrix or Value Scoring) and the target fields (Priority, Action Category, or any other applicable fields) are configurable.
      Tasks can be edited on the spot and will respond to location changes via the Workplace Command Center’s location dropdown.
  • Milestones PM+ component: This is the private listing to install. Along with Prioritization Helper, you also need to have Milestones PM+ installed (free or paid). 
    • The lightning component provides a list of Project Tasks sorted by a configurable priority field.
      The default priority is provided by a set of scoring conditions (Value Scoring) on the Milestone1_Task__c object, with the scoring conditions being customizable via Prioritization Helper's app interface.
      Project Tasks can be edited without leaving the tab and can be filtered to a single project's tasks by placing the component on a Project's record page.

Pairwise Comparisons

How-to/Creating new

We will use our own example to walk through creating a pairwise comparison.

  1. Decide on an objective - Our example will be choosing a theme to have at our Dreamforce booth.
  2. Enter your alternatives - Alternatives are all of the possible options. Our options were between Rockstar or Toolbelt.
  3. Enter comparison criteria - These are the different ways you will evaluate the alternatives. Our list was:
    • Willingness of booth team to participate
    • Swag appeals to visitors
    • Fits with current branding
    • Interactive elements appeal to visitors
    • Theme feels exciting to visitors
    • Theme is memorable to visitors
  4. Send it to all decision makers - We sent it to everyone in the company as all of the different departments (marketing, sales, leadership team, developers, etc.) would be affected by the decision.
PHAG2
PHAG3
PHAG4

Evaluations

Here are the steps all of the stakeholders and record owner will go through to submit their result. 

  1. Assign weights to criteria - Using the sliders, choose a number between 0-9 to indicate which of the two criteria are more important, with 0 being a tie and 9 indicating a criteria extremely more important than another.
    Weighing Criteria
  2. Weigh alternatives - This is the same process as weighing criteria, except this time you are judging each of the options against the criteria. The sliders will work the same way. Weighing Alternatives
  3. Individual results are calculated automatically - There will be a popup letting you know your results are sent. Afterwards, the owner and yourself may also view your individual results. All of the individual results will eventually be calculated together to decide an order of preferences, including their percentages.

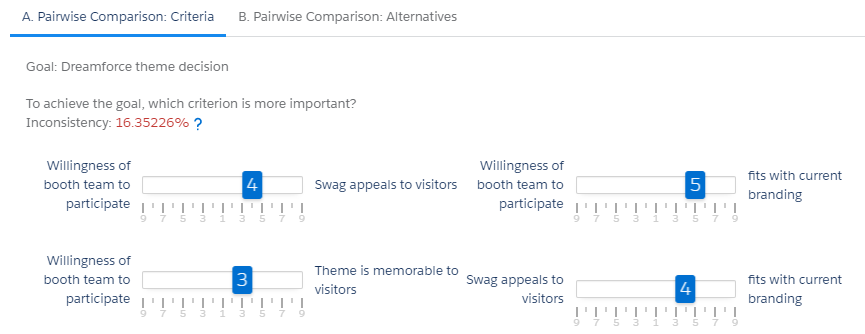
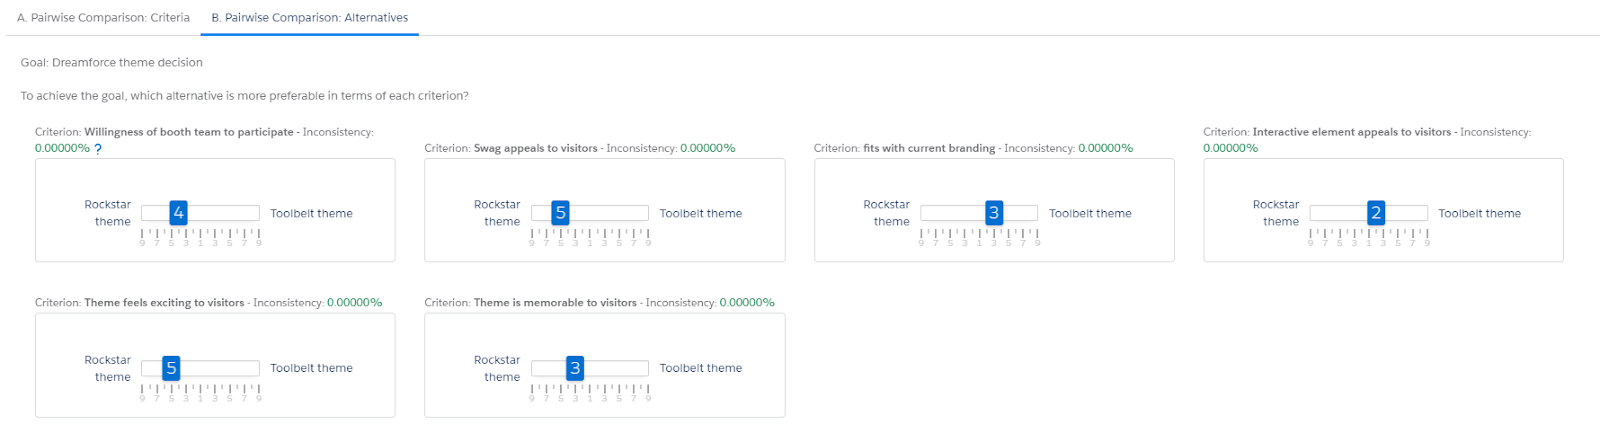
Both when weighing criteria and the alternatives, there will be an inconsistency rating (for criteria it’s in the top left corner, for alternatives it’s at the top of each section). This percentage will show people’s biases or mistakes. The higher the percentage, the more their results don’t line up with each other. You should aim to have your score under 10%, however you can move on to the next step no matter what score you get. This just gives you a chance to go back and fix any mistakes, or think about your choices longer.

Inconsistency Rating

Button menu

To see all of the button menu items, click the down arrow next to each pairwise comparison.

Pairwise Comparison Button Menu

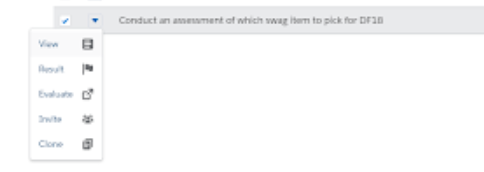
View - You are able to check the objective, alternatives, and criteria for this comparison.

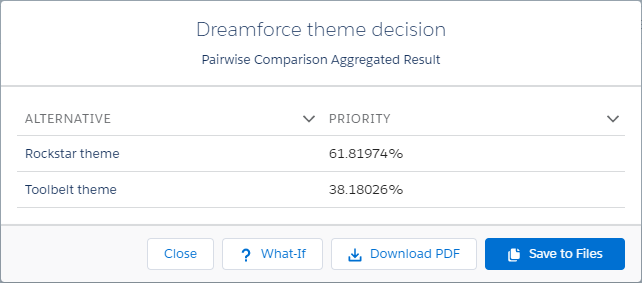
Result -  Aggregate everyone’s evaluations into a final result. Results can be saved as Salesforce files or exported as a PDF. In our case, Rockstar was the winner.

If you want to view individual results, click the number in the “participants” column.

Pairwise Comparison Results

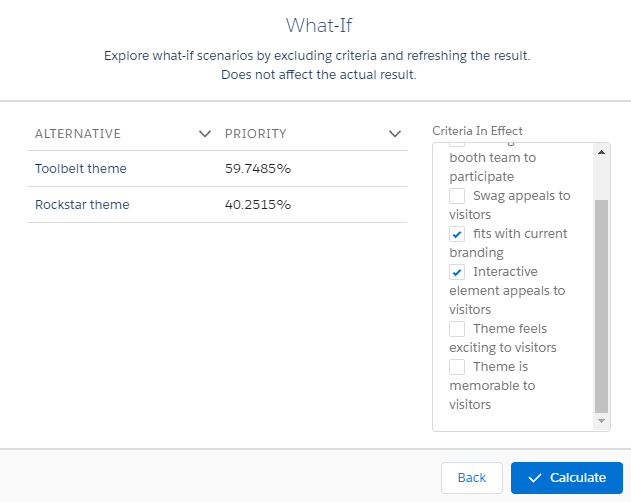
You can also perform a “what-if” analysis on the results. Here you can exclude certain criteria that may no longer be relevant, or was deemed least important by everyone. This will re-calculate the results excluding the criteria unchecked, and final results may change based on this new information. In this example, if we only consider if the theme fits with current branding and the interactive elements appeals to visitors, the winner is Toolbelt.

Pairwise Comparison What-If Analysis

Evaluate - Cast your vote by weighing the criteria and alternatives.

Invite - Invite internal or external users to evaluate the pairwise comparison through email. Instructions on how to invite external users further down.

Clone - Create a duplicate of the pairwise comparison.

Access Restriction

This feature leverages Apex Managed Sharing, which is only available in certain Salesforce editions. Please reference the “Required Editions” section on this page for a list of supported editions.

Access Restriction allows granting or revoking access to individual pairwise comparisons. Users who do not have access are unable to see results or participate in the selected pairwise comparisons.

This effect can apply to any group of users (Setup -> Manage Users -> Public Groups) or individual users who does not have permissions that ignores sharing rules.

The following users will ignore the restrictions:

  • Any user with the system permissions “Modify All Data” and/or “View All Data.” For example, users with the System Administrator profile.
  • Any user with  the “Modify All” and/or “Read All” permission on individual pairwise comparison objects, such as users with the “Prioritization Helper - Standard Access” permission set.
    • Use the “Prioritization Helper - External” permission set for users who need to follow the restrictions.
  • Any users targeted by specific custom sharing rules that allow them to bypass the private sharing model on the Pairwise Comparison related objects.

Usage:

  1. On the “All Pairwise Comparisons” tab, select one or more pairwise comparisons.
  2. Click the “Access” button located in the table footer to open the “Configure Access” modal*.
    • If the “Access” button is not clickable, please check if:
      1. Your Salesforce edition is in one of the applicable editions listed in the link above
      2. Org Wide Default Sharing Rules are set to private on all related pairwise comparison objects (App’s default setup) via Setup -> Security Controls -> Sharing Settings)
  3. In the “Configure Access” modal, the left side lists the groups and/or users who have access to this pairwise comparison. Click on each name to go to the user’s record page. Click on the ‘X’ to the right of each tag to revoke access.
    • By default, new pairwise comparisons created will automatically grant access to the “All internal users” group. If external evaluation (Salesforce Site Setup) is enabled, Site Guest Users will have access as well.
      Groups and Users that Have Access
  4. In the “Configure Access” modal, the right side contains a search panel. Type a group or user’s name to begin searching, then select the desired entries and press “Add Selected.”
    • The record owner (whoever created the pairwise comparison) cannot be added, and will always have access to the pairwise comparison.Search for Users or Groups
  5. In the “Configure Access” modal, while entries are selected in the search results table, press the “Remove Selected” button to revoke access for the selected user and/or groups.
  6. Press “Save” to update the access.

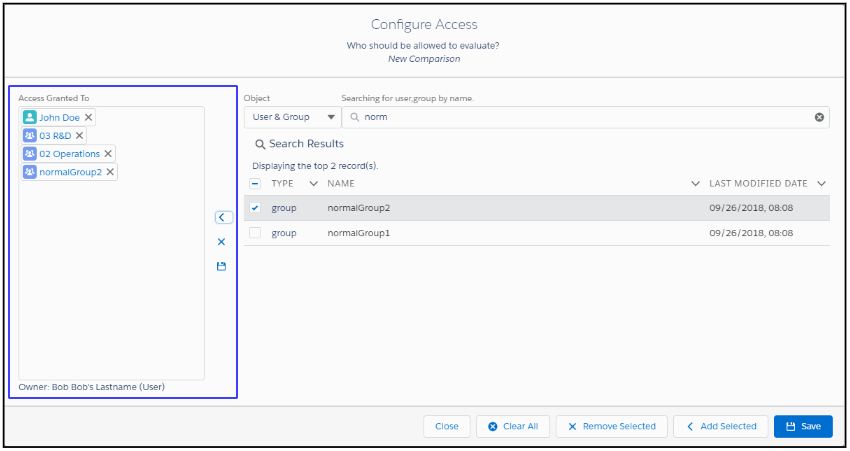
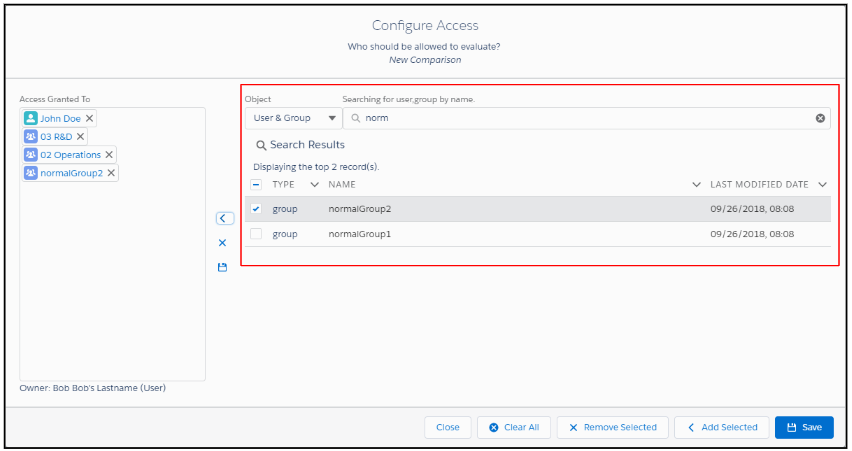
*The “Access” button can also be found in the button menu drop down or on the invitation modal. If accessed from the invitation modal, the email addresses of the user and/or groups who you granted access will be added to the invitation modal automatically.

External evaluation setup

This guide is only applicable to the following environments due to the Salesforce Sites dependency: Developer, Enterprise and Unlimited Editions

Your edition information can be found under Setup -> Company Profile -> Company Information, on the “Organization Edition” field.

To setup the site to enable external evaluation (one-time setup):

  1. Click “Setup” on the top right corner (or the gear icon in Lightning Experience)
  2. Click on the quick search input box on the left panel, type ‘Sites’. The search result will update as you type.
  3. Click “Sites
    • If the “Sites” option does not show up in the search results, your environment may not have access to Sites, or your user may not have the “Customize Application” permission to configure sites. In the latter case, contact your environment's administrator and request for the “Customize Application” permission, or ask the administrator to perform the following steps.
  4. If prompted, register a site domain. Please note the prompted instructions on the page and beware that the site domain cannot be easily changed.
  5. Press the “New” button to create a new site, complete the form as follows (bolded lines must be entered exactly as specified):
    • Site label - PRTZ External Evaluation (or any name of choice)
    • Site name - prtz_groupeval
    • Site description - For Prioritization Helper’s external group evaluation (or any description of choice.)
    • Site contact - The user will be responsible for maintaining this site
    • Default web address - prtz (or any name of choice)
    • Active Site Homepage - PRTZ_Evaluator_VF
    • Active - Checked
    • All other options can be left as default.
  6. On the configuration page for the newly created site, press the “Public Access Settings” button. This will open the Site’s profile page.
  7. On the profile page, press the “Assigned Users” button. This will open a page with the Site user listed.
  8. On the Site user list page, click on the User entry to open the user record page.
  9. On the user record page, press the “Edit Assignments” button on the “Permission Set Assignments” section header
  10. Select the “Prioritization Helper - External” entry, add to the box on the right, and press “Save”

After the above steps are completed, to generate the link for external users:

  1. Open the “Prioritization Helper Home” tab
  2. Select any pairwise comparison
  3. Press the “Invite” button to open a modal
  4. On the modal, press the template icon button on the top of the modal to open the dropdown menu.
    • If the icon button does not exist, please double check the bolded items above
  5. On the dropdown menu, select “Overwrite with external links
  6. The link will be generated in the email body.

Matrix Scoring

Creating a table

  1. Select an object to prioritize. Ultimately the formula field will be placed on this object.
  2. Select two picklist fields to use as the matrix's rows and columns. The columns are the "criteria" that can be weighed against the rows, which are the "alternatives." It’s important to determine which is the criteria as they have associated weights, while alternatives will have different numbers in each cell.
    • The chosen fields does not have to fit into the common meaning of a "criterion" - anything can a criterion, as long as it may weight differently overtime.
    • For example, when prioritizing cases, the criteria could be the impact to customers, and the alternatives could be the case type. With a setup like this, cases with an incident that highly impacts customers will be assigned a higher score, while product customizations with no impact to customers will have the lowest score. However, as time passes, if a different product should be given more attention, the priority can be easily adjusted by changing a couple weights of the products, serving as the criteria.
  3. After the fields are selected, the matrix will be generated below.
    • The picklists’ values will become the matrix's row and column labels.
  4. On the top row, rate the different criteria by importance. This number will ultimately be multiplied against each cell to get a final score. You can reuse numbers if multiple criteria carry the same weight, and you can use decimals, such as .5.           
  5. Assign ratings in the individual cells for each alternative (in this example case types) against each criterion (impact to customers). Same rules apply - you can reuse numbers and use decimals. 
    Each cell will hold the score of a record, which is the product from the numbers in the cell, multiplied against the criteria weight. 
    PH Matrix
    Given the above, when the picklist field’s values on a record are "Incident" and "High," then the final score will be 16.
  6. Remember to save your work frequently.
  7. On the “Label Value Ranges” tab, press the “New Condition” button located in the footer to define labels for the scores. This section is optional.
    • Numbers without context are meaningless. A priority field displaying a number 50 on a task record could mean anything. Is that based on a score out of 100 or 1,000? You can define a range of scores where the formula field should output text or an image instead. For example, if the score on a record is between 1 and 50, display 'Low', or if the score is between 51 and 100, then display a thumb up image.
    • Here is an example:
      PH matrix scoring labels
  8. On the “Create/Update Field to Display the Result” tab, enter a field name and create the field.
    • The field will be automatically added to the page layout and become visible to all users. You can further configure that or other details of the field by clicking on the link to the field definition page.

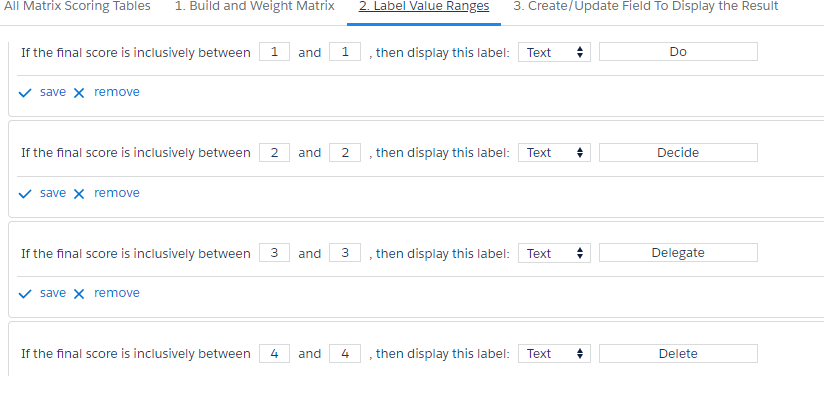
Note: Changing the matrix or labels does not automatically change the formula. To write any changes, please navigate to the last tab where the field was created, and press “Update Formula Field.”

Value Scoring

Creating an entry

  1. Select an Object to prioritize. Ultimately the formula field will be placed on this object.
  2. Add conditions for how to calculate scores.
    • Choose a field that will influence the object’s score. It can be a positive or negative impact.
    • Decide the comparison operator for that field
    • Input the number or text that fulfills the conditional statement
    • Put in the number of points this condition should add or subtract. Use negative numbers to subtract points.
    • Optionally add the point value that any other field option outside of the condition should have. Otherwise leave as 0.
    • Save your condition and repeat for any other conditions
      Value Scoring Conditions-1
  3. Create Range Labels. This section is optional.
    • Choose the number of labels, and whether you want them divided linearly or exponentially. The range increments will be automatically created for you.
    • Decide if you want a text or image label, then put in the text or image you would want displayed.
    • The algorithm next to each label quickly shows the range of point values each label covers. In our example each label covers two points. This is more useful when choosing exponential growth.
      Value Scoring Labels
  4. Records Preview. This step is optional.
    • Use this page to preview how the defined conditions will apply to the actual records. Press the "Find Records To Preview" button to search for records.
  5. Type in the Result Field Name, then press the “Create Field” button

Using “Field Value as Score” in Formula Mode

In Formula Mode, the "field value as score" operator is available for number type fields. Use this operator to output the field's value as the score. For example, if the field is Rating__c with a field value of 5 on a record, then the record will have 5 points added to its final score.

The "lowest" and "highest" input boxes can be left blank if there are no range labels. However, if range labels are to be used, please input the lowest and the highest possible values that the field can contain, so the range labels can cover the entire possible score range. Otherwise, if a score falls outside of the range, the score will be "undefined".

Field Value as Score

Creating a custom operator (advanced)

  1. Navigate to Setup -> Objects -> Value Scoring Condition
  2. Click on the "Operator" field
  3. Add the desired operator name as a new picklist value, e.g. within the last X years (DateTime)
  4. Edit the new picklist value, enter the formula as the API Name, e.g., (now()-{0})>=0&&(now()-{0})<=({1}*365)
    • {0} is the field value, {1} is the value to be compared to 
  5. Back on the Operator field's configuration page, look for the "Controlling Field" label and click the underlined "Change" link.
  6. Click "View All" on the dependency table
  7. Look for the column this new operator belongs to. For example, if we are adding the "within last X years" operator, it will be a DATETIME operator compared to a number (X years), so, the column will be DATETIME-NUMBER.
  8. Under the appropriate column, double click the new operator so it becomes yellow
  9. Press the "Save" button to save the dependency
  10. Navigate back to the Value Scoring tab in the app and refresh the page. The new operator should be available to select, in this case, for any datetime fields.

Formula and Apex Mode

A new saved Value Scoring Entry will default to Formula mode. You can convert the mode to Apex mode by saving the entry, then clicking on the "Clone & Convert from Formula to Apex Mode" link.

After clicking the link, the current entry will be cloned to Apex mode, and the page will automatically switch to edit the new cloned entry.

Note

  • The result field will not be cloned.
  • Range labels will not clone from Apex mode to Formula mode due to the restricted ranges in Formula mode.
  • To convert from Apex back to Formula mode, click on the same link and it will be cloned and converted again, repeating the same process.

Here are the advantages and disadvantages of each mode:

Formula Mode -

  • Reliable and instant results (No DML updates)
  • Supports relative dates (Today, Yesterday etc.)
  • Supports custom operators
  • Bypasses validation rules
  • Limited complexity and quantity of conditions (5,000 compiled size limit)
  • Not all fields are available (e.g. rich text fields)
  • Change in value does not trigger workflow / other processes

Apex Mode -

  • Higher complexity and quantity limit of conditions
  • Change in value will trigger workflow / other processes
  • No compiled size limit
  • More available field types (e.g. Long Text Area)
  • Does not support relative dates (Today, Yesterday etc.)
  • Update maybe blocked by validation rules
  • Requires initial batch run to update existing records
  • Requires trigger deployment to update new/edited records

This detailed list of advantages and disadvantages of each mode is also available in the app when you hover over the "Clone & Convert from Formula to Apex Mode" link.

Differences When Creating a Value Scoring Entry in Apex Mode

The steps to create a Value Scoring Entry in Apex mode are similar to that of Formula mode. However, there are some minor differences on the User Interface.

Here is a list of those differences:

  1. "All Value Scoring Entries" tab:
    • The "Activate/Deactivate" button disables real time updates for the selected Value Scoring Entry in Apex Mode only.
    • The "Settings" button opens a modal with the "configure realtime modal" link, allowing enable/disablement of real time updates at a per object level.
    • Note: Please un-deploy the triggers before the license expires to avoid record operations being locked. Use the "configure realtime modal" in the app to undeploy all unmanaged triggers prefixed with "PRTZ_". If the package has already expired and the app became unavailable, remove the triggers by deploying a destructiveChange.xml or contact us at support@passagetech.com for help. Warnings will be displayed on the main interface, on the realtime modal (for Trial licenses), and an email will be sent to the installer user (or if the installing user is inactive, the latest active administrator)  7 days prior to the license expiration date.
  2. "Score Conditions" tab:
    • The "compiled size" gauge will be hidden, because Apex mode has no compiled size limit.
    • More field types (such as Long Text Area) will be available in Apex mode.
  3. "Set Range and Labels" tab:
    • The range is freely configurable and is not locked to Linear/Exponential.
  4. "Records Preview" tab
    • This tab is the same as Formula mode.
  5. "Finalize Result/Set Field and Update Records" tab
    • Instead of creating a field, choose an existing field to write the result.
    • After choosing a field, click the "Update Records in Batch" button to initiate a batch update populating the score to all existing records.
      1. Be careful to not choose any existing field containing important information. It will be overwritten.
    • The "Real Time Configurations" button opens a modal allowing enable/disablement of real time updates at a per object level.
    • The "Update Records in Batch" button will update existing records with the scores retroactively, and enabling realtime will keep all future record updates up to date with the scores.

Value Scoring Apex Scheduled Runs

Schedule a batch run for any Apex Value Scoring Entry via each entry's action menu.

  • The schedule will be recurring as defined by the "Unit" and "Increment" values.
  • The "Previous Fire Time" field is for information purposes only.
  • To stop a schedule from running, delete the schedule by clicking the "Delete" button on the schedule modal's bottom left.
  • To change all schedules' running user or stop all schedules from running, click the "Setting" button and follow the instructions there.

Value Scoring Apex Exceptions

Exceptions are logged when Apex Value Scoring's batch run fails.

To view the exceptions, first select an Apex Value Scoring entry, then click the "Setting" button and follow the directions.

Exceptions older than 2 days are automatically deleted. To disable or change the duration, find the settings in the same "Setting" modal mentioned above.