Installation

Install Rollup Helper Free Edition from the AppExchange.

  1. Click the "Get It Now" button and then choose an option for logging in, if you haven't logged in already.
  2. Once you're logged in, you'll be prompted to install Rollup Helper in Production or in Sandbox. Once you've made your choice, please read and accept the terms and conditions and then hit the "confirm and install button" (you may be prompted to log in again for verification).
  3. Choose the security level that best fits your needs. This decides who has access to the Rollup Helper tab. Everyone will still be able to run your defined rollups even if they don't have access to the Rollup Helper package. For most clients, the recommended option is Install for all users.
  4. To open up the application in Lightning, go to the top-left App Menu and search for "Rollup Helper." In Classic, go to top-right of the window, click the Application drop-down tab, and then select "Rollup Helper" from the list of applications.

Permission Sets

After completing the installation of Rollup Helper, we highly recommend assigning users who will utilize it to the Rollup Helper permission. This will give them full access to all of the functionality and data they need in order to make proper use of Rollup Helper. It will also ensure that as pages are changed over time, there will be no need to manually update each individual profile.

To do this:

  1. Go to the top of the page and click Setup
  2. On the left side panel, under Administer, open the Manage Users list and click Permission Sets
  3. Click on the Rollup Helper - All Access permission
  4. Click Manage Assignments
  5. Check the boxes next to the users you'd like to assign to the set (the ones that will use Rollup Helper)
  6. Click Assign

Permission sets allow you to group together desired permissions and add or remove them to individual users as opposed to having to change the users' profiles. You can also use permission sets to extend permissions to users across different profiles.

For instance, if you needed to set permissions for employees who conduct interviews, but the 'interviewer' title applies to users with different profiles and so on, you could create a new "interviewer' permission set containing the needed permissions and then assign those users to the permission set, or remove them as necessary, all without having to change user profiles.

See Permission Sets Salesforce Documentation for more information.

Rollup Helper Home tab

Create a New Rollup. Use the Rollup Helper interface to easily create new rollups.

View Existing Rollups. View, Edit, Run, Delete, Schedule, or Activate/Deactivate existing rollups.

Export to .CSV File. Exporting to a .CSV file will allow the rollups to be moved from one org to another or to provide a backup of your rollup configuration (i.e. Sandbox to Production). The metadata such as the fields used for the rollup results are not included and have to be moved through a change set or recreated in the new environment.

View Health Check. Allows you to check on Rollup Helper’s status, view a risk level assessment for any issues, and offers action items to resolve any issues. Please see the Health Check section below for more information.

Help and FAQ. Includes in-app resources such as:

  • Frequently Asked Questions
  • Troubleshooting Tips
  • Help Videos

Enable Real-Time. Use the Rollup Helper interface to deploy real-time triggers. If you need Foreign Key or Visualforce page triggers, view our Developer Guide for instructions.

Deploy Pre-Built Rollups. Deploy pre-built use cases from the Use Case Deployment page and visit our Use Case Library for examples of rollups by object, type, solution, and more.

Manage Scheduled Jobs. View the next fire time for schedule rollups. Edit scheduled intervals or delete schedules entirely. 

Monitor Rollup Queue. See which rollup settings are currently running and intervene if they're getting stuck. 

Security

Field Access. You can determine who has access to view Rollup Helper results by setting Salesforce Security on the field.

Tab Access. In order to prevent certain users from creating or editing rollups, be sure to hide the tabs. Learn more here.

Creating a Rollup

Step 1: Select Destination Object

This is the parent object where you want to see your rollup results. For example, if you are counting the number of Contacts on an Account, Account would be the parent and the option you would choose.

For premium edition users, there is an option to configure a grandchild rollup to see results on a grandparent level. Click the checkbox by ‘Create Grandchild Rollup?’ to enable grandchild rollup configuration. Then select the grandparent where you want to see your rollup results. For example, if you are counting the number of Products on an Opportunity, rolled up to Account, Account would be the grandparent and the option you would choose.

Step 2: Select Target Field

This is the field you are rolling up to on the parent object. You can either:

  • Create a new field on the object before entering the Rollup Helper interface and select it from the list.
  • Use an existing field of the correct data type by selecting it from the list.
    • If you use a field that already exists, Rollup Helper will overwrite any data that resides in the field unless you uncheck the Overwrite Existing Target Field Information flag in Advanced Settings (located in Step 3: Select Source Field).
  • Select Create a new field to create your results field from within the app.
    • For Professional Edition Salesforce orgs and lower, Salesforce has restrictions in place that block the use of API for field creation. If you are in a Professional Edition Salesforce org or lower, please create the field on the object as instructed above and then select the field to create your rollup.
    • Field security and page layouts can be changed from Salesforce Setup.

Changing Field Names

The field label used by Rollup Helper can be changed at any time. Please note, changing the API Name of the results field will cause the rollup to stop working unless you change it in the rollup as well.

RHAdminGuideStep2

Step 3: Select Source Field

Which object would you like to use as the source of your rollup? This is the child object that you are getting the data from.

  • Select Child Object: In the earlier example of counting the number of Contacts on Account, Contact is the child and would be the selection here.
  • Select Relationship Field: All available relationships between the parent and child will appear here.

If configuring a grandchild rollup, the intermediary object and grandchild object will need to be selected.

  • Select Intermediary Object: In the earlier example of counting the number of Products On Opportunities On Account, Opportunity would be the selection here.
  • Select Intermediary Relationship Field: All available relationships between the grandparent and intermediary object will appear here.
  • Select Source Object:  In the earlier example of counting the number of Products On Opportunities On Account, Product would be the selection here.
  • Select Relationship Field: All available relationships between the intermediary object and grandchild object will appear here.

Which field on ‘Child Object’ should we use as a source for your rollup?

  • Select Type
    • The options here are based on the data type of the target field. If you are rolling up to a number field, for example, you would have options for Count, Max, Min, Average, and Sum but not Text or Checkbox.
    • If you choose to create a Text rollup, you will be able to select the character that separates each value in your rollup results.
    • Select "Custom Delimiter" to enter your own separating character(s). Note that any whitespace in this value will be removed.
    • If you choose to separate values with a comma, you also have the option to append "and" between the last two values in your rollup results.
      • If this setting is checked, rollup results will be formatted as "one, two, and three." If unchecked, results will be formatted as "one, two, three."
  • All fields on the child object of the same or a compatible data type as the target field will appear in the list. For example, if you selected a Text field as the target in Step 2, fields that house data than can be aggregated in a Text field will appear. If the source field you want to use isn’t in the list, please check the data type of the source and target.
    • Tip for Count rollups: The ‘Deleted’ field will be automatically selected for Count rollups by default. Selection of the ‘Deleted’ field (or any other field that is guaranteed to be populated on every record) ensures that all records are included in the count. A filter can be added later to narrow down the results that are returned in the rollup.
    • Tip for Unique Count rollups: You will have to select “Count” rollup first, then you will have the option to check “Unique Count.” If checked, Rollup Helper will only include unique source records by source field during rollup calculations. The source field must be set to a source field other than isDeleted in order to enable Unique Count.
  • The Query Preview displays the query that will be run for the rollup.

Name and Description

  • Label: Enter a meaningful name for your rollup.
  • Description: Describe what the rollup is doing as well as how and where it is being used.

Audits

When you Edit a Rollup, you will be able to change any of the fields and filters that you had access to when creating the Rollup. There will also be a new “System Audit Fields” section at the bottom, which will show information on creation and modification dates. You can also see an audit of activation status changes here. The “View Audit Record” button will direct you to a matching PS_Rollup_Audit__c record. When changes are made to a rollup, the associated Rollup Audit record will get updated as well. Standard field history tracking may be set up on the Rollup Audit object to track changes made to rollups.

Advanced Settings 

  • Use a Custom Sort Field for Max/Min Rollup
    • This option is only available when the rollup aggregation type selected is “Maximum” or “Minimum”.  
    • If unchecked, Rollup Helper will sort by the source field in the appropriate direction by default.
    • If checked, Rollup Helper will allow you to specify an independent field to sort by. For example, if you wanted to roll up the subject of the most recent task, you could select “Subject” as the source field for a Maximum rollup, select “Use a Custom Sort Field for Max/Min Rollup” in the advanced configuration, and choose the desired date field to sort by.
  • Overwrite Existing Target Field Information
    • Selected by default and will update the target field on all records.
    • If unchecked, Rollup Helper will not overwrite any field that contains data.
      • Use this if you have data that you do not want to be overwritten, but keep in mind that Rollup Helper will then only update records that have a blank value in that field.
      • If you have data on some records that you don’t want to be overwritten, consider creating a new field for Rollup Helper to update.
      • Rollup Helper will still append new values to the target field, unless the “Append To Existing Target Field Information” setting is unchecked as well.
  • Append To Existing Target Field Information
    • Selected by default if Overwrite Existing Target Field Information is checked.
    • If unchecked, Rollup Helper will not append any new values to a target field.
      • To uncheck, “Overwrite Existing Target Field Information” will need to be unchecked first.
  • Blank Overwrite Existing Target Field Information
    • If unchecked, Rollup Helper will not overwrite any field that contains a non-blank value, with a blank value.
  • Disable Multiselect Picklist Split
    • Unchecked by default and will count each selection in a mutipicklist as a separate child value.
    • If checked, Rollup Helper will not count each selection as a separate child value.
  • Trim Trailing Delimiters
    • If checked, Rollup Helper will trim any delimiters that would be placed at the end of the rolled-up text value.
  • Unique Values Only
    • Check to ensure that Rollup Helper does not add any string value to the rolled up text more than once.
  • Select Opportunity date field used for dated currency conversion.
    • Setting that appears for orgs with advanced currency management enabled.
      • Allows the selection of another date field to be used as the dated currency conversion field.
  • Nulls Count Toward Average Calculation
    • Unchecked by default for AVG rollups.
    • If checked, null values in source fields will count as 0.
  • Escape Filter String Special Reserved Characters
    • Selected by default.
    • Use this option unless you have a specific reason to prevent Rollup Helper from escaping SOQL reserved characters (i.e., ‘ or \).
  • Enumerate Text Rollup Results
    • Unchecked by default for TXT rollups.
    • If checked, child record values will be numbered in the form "1)... 2)... 3)...." in the rolled-up text value.
  • Roll Up Zero Result As Null
    • Unchecked by default for SUM and AVG rollups.
    • If checked, when no matching child records are found for SUM or AVG rollups, Rollup Helper will roll up the results as null instead of 0.
  • Query Archived Records 
    • Unchecked by default.
    • Selecting this option will rollup from archived and active Salesforce records.
  • Disable Realtime
    • If checked, will not roll up when run in realtime.

Step 3 of creating a rollup
Running The Rollup

When running, either by clicking Save and Run from the rollup creation page or from clicking Run from the All Rollups Tab, there is a two-step run process.

  • Time Estimation gives an approximate run time based on the number of records to be processed. This time can vary based on other processes running in the org.
  • Optionally, select a parent filter for the rollup run. The parent filter chosen will narrow down the list of records that are updated by the manual run, resulting in a shorter run time if the rollup does not need to be updated for all records.
  • Click ‘Run Once For All Records.’
  • Click ‘OK’ on the pop-up to allow the target field to be overwritten.
    • If you don’t see the pop-up after clicking ‘Run Once For All Records,’ a pop-up blocker may be preventing it.

Run Rollup Diagram 10-10-22

Applying Filters to Rollups

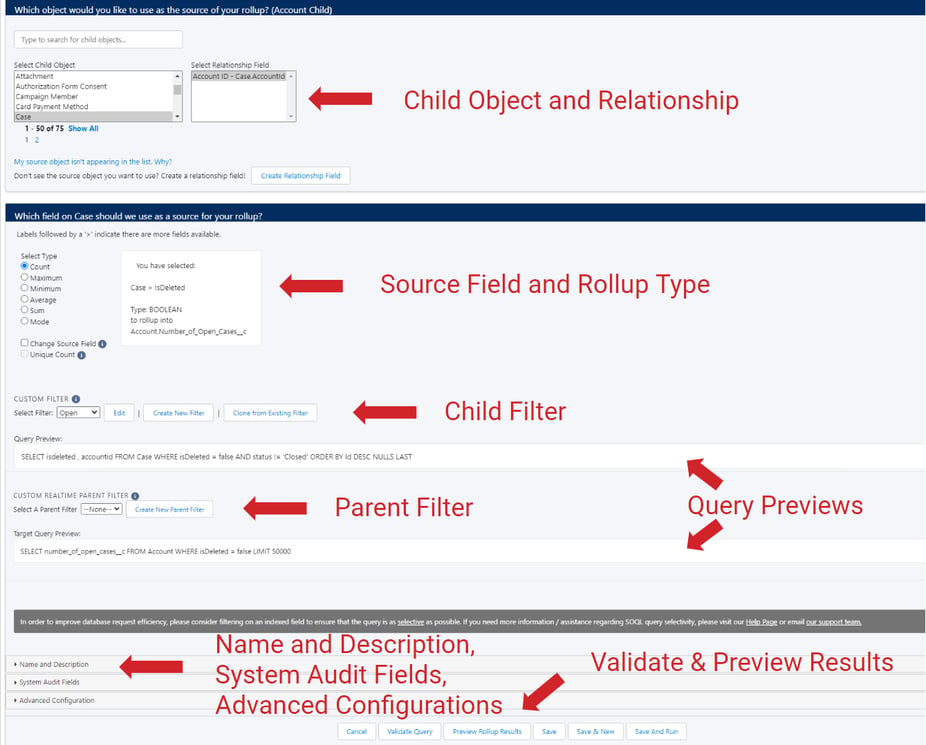
During Step 3: Select Source Field, you can choose an existing filter or create a new filter. Filters can be created from scratch or as a clone of an existing one (if another filter with the same object type exists in the org). If cloning from an existing filter, the criteria on the existing filter will be carried over to the new one and can be further edited.

A rollup can be associated with both a child filter that defines which child records should be rolled up to the parent, and a parent filter that defines which parent records should be processed by the rollup.

Both child and parent filters can be applied to multiple rollups simultaneously and can be used interchangeably - a child filter can be used as a parent filter, and vice versa. Please note that any record limits or custom sorts set on a child filter will be ignored when used as a parent filter, as parent filters do not support record limits and custom sorts.

  • Child Filters
    • Child filters are used to define which child records should be rolled up to the parent. During "Step 3: Select Source Field" of creating or editing a rollup, you can choose to apply an existing child filter or create a new filter after selecting a source field. Child filters can be created from scratch or as a clone of an existing one (if another filter with the same object type exists in the org). If cloning from an existing filter, the criteria on the existing filter will be carried over to the new one and can be further edited.
    • Please note that referencing the target object through a cross-object child filter will not exclude those target records from being rolled up to. In order to ensure those target records are not updated, consider using a parent filter to exclude those target records.
  • Parent Filters
    • Parent filters are used to define which parent records should be processed by the rollup. When manually running a rollup or creating a schedule for a rollup, you can choose to create a new parent filter or apply an existing one (if another filter with the same object type exists in the org).
    • Parent filters can also be used in realtime contexts. During "Step 3: Select Source Field" of creating or editing a rollup, you can choose to apply an existing parent filter or create a new parent filter after selecting a source field. This will ensure realtime runs will only update for the desired target records.

Creating a New Filter

Enter Filter Name
  • Filters can be reused for other rollups on the same object, so make sure to give your filter a meaningful name that you will be able to recognize in a list.
Limit this rollup to __ child records per parent (Child Filter Only)
  • Leave this blank for rollups that are only going to provide one result because they are aggregating data (sum, average). Otherwise, enter the desired number of results you would like to see. For example, if you are creating a rollup with the name of the most recent three Opportunities, enter 3.
  • This field will auto-populate with a 1 for Min or Max rollups.

Offset (Child Filter Only)

  • Skips __ child records per parent (Child Filter Only): Enter the number of child records to skip for each parent to rollup the nth most recent result. For example, if you are creating a rollup with the name of the three most recent Opportunities, enter 1 to rollup the second most recent Opportunity.

Specify Sort Order (Child Filter Only)

  • This step can be skipped if the results returned do not need to be sorted. For example, rollups that are aggregating data such as sum, count, or average do not require sorting.
  • For rollups where you are limiting the number of records returned, or any rollups where you want the results sorted such as a list of text or dates:
    • Select the field you would like Rollup Helper to use to sort your records by.
    • Select Sort Order
      • Descending will return the newest or largest results or from Z to A alphabetical sort.
      • Ascending will return the oldest or smallest results or from A to Z alphabetical sort.
Specify Filter Criteria
    • Select any field that you would like Rollup Helper to filter records on.
    • Add an operator.
      • When using last_N filters
        • If you select = and enter a number, Rollup Helper will return results from the last year, month, etc. and the ones before that depending on the number. For example, if the current year is 2017 and you use the last two years, your results would include 2016 and 2015. It will exclude 2017.
        • If you select < and enter a number it will return results from before that date. For example, if the current year is 2017 and you use the last number of years < 2, your results will be from 2014 and all previous years. It is important to note that when using < that all years, months, etc. from before that grouping will be included.
        • If you select <= in the same example as above, the results would be from 2016, 2015 and 2014 and all previous years.
        • Salesforce Relative Date Filter Reference documentation.
    • Select Criteria
      • When entering Criteria via a text box
        • By default, commas can be used to separate multiple values. This transforms the equals and not equals operators into “IN” and “NOT IN”, allowing the filter to match against a list of possible values.
        • Unchecking the “Separate Criteria Into Multiple Values” checkbox will allow entering commas without separating the Criteria into multiple values.
      • When creating criteria on a polymorphic relationship field:
        • Click "Create Sub-Filter" to open the sub-filter modal. This sub-filter will allow you to create multiple filter criteria on a polymorphic field in the context of a specific object type.
        • A maximum of two sub-filters are allowed per filter.
    • Submit. 
    • Repeat these steps to add additional criteria to your rollup.
    • Click Save.
      • Once you save the filter, it will be available to use on additional rollups.

All Rollups

Run Mode displays the manner in which your rollups will process. Please note that all icons besides "Inactive" will only display if the rollup is active.

  • Real Time - In addition to the rollup being active, this icon will only display if an active trigger is deployed for the rollup's source object. This icon will not display if "Disable Realtime" or "Disable Trigger" are enabled for the trigger
   bolt-exclamation Partial Real Time Enabled For This Rollup - This icon will only display for rollups with foreign key source fields. Realtime runs will only happen when changes are made to source records.
  • Real Time Disabled On Source Object Or Trigger
  • Real Time Disabled For This Rollup
  • Scheduled
  • Manual Run
  • Inactive
  • Does Not Overwrite Existing Field Values
  • Does Not Overwrite Populated Fields With Blank Values

Condition. Clicking on the condition will allow you to edit the filter criteria without first going to the rollup. Please note that if you edit the filter, it will change the filter criteria for all rollups that use this filter. If you do not wish to change it for all rollups, we recommend creating a new filter.

Activate. Allows you to activate/deactivate rollups either individually or all at once.

Action.

  • Run: Manually run your rollup.
  • Schedule: Create or Edit a schedule for your rollup.
    • Active checkbox will activate/deactivate the schedule.
    • Schedule Name: Give the schedule a meaningful name like “Daily.”
    • Run Every: Determine how frequently you would like the rollup to run.
    • For __ “Your Parent Object Name” Records
      • Identifies how many total records you have.
      • Scheduling for less records to process than your total means that the rollup will stop processing when it reaches that number but will resume with the next record in line on the next scheduled run.
      • You can check “Run for All Records” to have Rollup Helper automatically update the schedule with the correct number of records to run for.
  • Edit: Edit either the rollup, the filter, or both.
  • Clone: Clone the rollup and choose the new target field to update. 
  • Share: Get a URL you can share with other internal users in your org.
  • Delete: Delete the rollup.

Settings (gear icon at the top of the page): In the settings pane you will find various Rollup Helper settings as well as the ability to change the running user for Rollup Helper. The settings will be explained in further detail in the “Custom Settings” section below. The “Run As” user is the user that scheduled rollups will process as. To change it, you can take the following steps:

  1. Go to your setup page.
  2. Search “Setup” for “Scheduled Jobs” (or in Classic, navigate to it via Monitor > Jobs > Scheduled Jobs from the left-hand column).
  3. Delete the scheduled job named Rollup Batch Agent - Hourly (you should be able to see that the “Submitted By” is set to the current “Run As” user, which is likely “Rollup Helper” as that is the default if the Run As user has not been changed.
  4. On the All Rollups page, open the settings menu with the gear icon at the top of the page and click the “Run As…” button at the bottom of the window that pops up.
  5. Your All Rollups page should now say “Running as [Your User]” at the bottom of the rollup display table, and if you were to return to the scheduled jobs page, you should now see a “Rollup Batch Agent - Hourly” job scheduled with the Submitted By user as your user.

Rollup Groups. There is a dropdown menu near the top left that allows you to view “All Rollups” or view rollups that are grouped together. Click the action menu next to the rollup group dropdown and select "Create Rollup Group" to create new groupings. Give your group a name, and then select the rollups you want in that group. Creating groups lets you find rollups easier. You can also add a rollup to multiple groups.

  • Configurations may be done in two different ways:
    • Manual: Rollups are selected individually by the user. New rollups will need to be manually added after creation.
    • Automatic: Rollups are automatically sorted based on the selected grouping and value. Groupings include source object, target object, rollup type, child filter, and parent filter. Values are prepopulated to include all possible values based on current rollups. When new rollups are created or edited, they are automatically assigned to automatic rollup groups if they match.

All Rollup Diagram


Convert DLRS Settings Into Rollups

  • At the top of the All Rollups page, click on the “Convert Rollups” button to access the Convert Rollups page.
  • Click “Select” next to the DLRS setting to convert into a Rollup. 
    • If the DLRS setting is active, a modal will appear explaining that Rollup Helper will attempt to disable the DLRS setting after the rollup is saved.
  • Once clicking “Select” from the table or “Convert” from the modal, the page will redirect to the rollup save/edit page, where the configuration of the rollup can be verified.
  • Relationship criteria will not be transferred over, so a filter will need to be created by clicking “Create New Filter” on the rollup save/edit page.
  • Click Save once configuration is complete.
    DLRS converter

Rollup Helper Exceptions

  • The ‘Select A Target Object’ Dropdown will only have objects listed that have exceptions. If there aren’t any objects in the list, no exceptions have been logged.
  • Select the object from the list that you would like to view exceptions for and click Go!
  • The exceptions page will show the exception stack trace, the date it occurred, and the IDs of the records that failed to update as well as how many records were affected.
  • The exception cleanup frequency is customizable. More details in the Custom Settings section below.
  • To kick off a retry, click the link to set up the retry job on the Exception page and set the time for the job to run. You can retry all Objects that have exceptions, or enter a comma-separated list of Object names to retry.

Health Check

Accessible through the "Rollup Helper Menu" dropdown on the All Settings page, this page provides a detailed overview of all Rollup Helper filters in your org and allows you to perform several actions on these filters.

  • Risk Level: Risk assessment for the issue found.
  • Issue Found: Identifies what the issue was.
  • Issue Summary: Summarizes the issue into a category and includes help text about the issue.
  • Action: Recommended course of action to resolve the issue.

Filter Management

Table Overview:

  • Filter Id: The unique name of the filter. This value is generated on filter creation and cannot be changed.
  • Name: The user-input label of the filter, if any. This is the name used to reference the filter on other Rollup Helper pages.
  • Rollup: All rollups that currently use the filter as the child or parent filter.
  • Filter Type: The way the filter is utilized by its associated rollups. One of three values will display for each rollup listed in the "Rollup" column:
    • Child Filter: The filter is used as the child filter for the given rollup.
    • Parent Filter: The filter is used as the parent filter for the given rollup.
    • Child Filter and Parent Filter: The filter is used as both the child and parent filter for the given rollup.
  • Object: The object that the filter can be used on.
  • Action: A dropdown list of actions that can be performed on the filter. Actions in this list include Preview, Edit, and Delete.

Available Actions:

  • Preview Filter: Filters can be previewed by clicking the "Preview" link in the Actions dropdown. This will open a modal detailing the behavior of the filter, including:
    • Record Limit: The maximum amount of child records that will be processed for each parent record.
    • Criteria: The conditions of the filter.
    • Boolean Logic: The boolean logic used to combine all filter conditions into a single filter string.
    • Query Preview: A sample of the query that will be used to retrieve and sort records in accordance with the filter.

The following details will only be displayed if the filter is utilized as a child filter:

    • Offset: The number of child records that will be skipped for each parent record.
    • Sort Order: The fields that are sorted by the filter, and the sort order for each field.
  • If a filter is used as both a child and parent filter, separate sections will be displayed to highlight the different behaviors.
  • Delete Filter: Filters can be deleted one-by-one or in bulk. When a filter is deleted, all rollups utilizing that filter will be updated to clear the filter reference.
    • Delete Single Filter: A single filter can be deleted by either selecting the checkbox next to the filter and clicking the "Delete" button near the top of the page, or by clicking the Actions dropdown and selecting "Delete."
    • Delete Multiple Filters: Multiple filters can be deleted by selecting the checkbox next to each desired filter and clicking the "Delete" button near the top of the page. To delete all filters, click the "Select All" checkbox at the top of the table and click the "Delete" button.
  • Edit Filter: The details of a filter can be edited by clicking the "Edit" link in the Actions dropdown. This will redirect you to the Filter Edit page where you can change the name, limit, offset, sorts, criteria, and logic of the filter.
  • Edit Associated Rollups: Each rollup associated with a filter can be edited by clicking on the rollup's name in the Filter Management table. This will allow you to edit the configuration of the rollup and change or remove its child and parent filters.

Enable real-time rollups

By default, your rollups from Account, Attachment, Task, Contact, and Event records are enabled for real-time. Please note: For Professional Edition Salesforce orgs (without the API Workflow Add-On), and for lower editions, Salesforce has restrictions in place that will not allow custom apex triggers to be added for any standard or custom objects that are not included as part of the managed package. Any triggers that come included with the managed package can be used in Professional Edition and lower orgs. We do have trigger extension packages available for most standard objects, and workarounds are available for real-time enablement on custom objects. Contact us for assistance.

To create Foreign Key or Visualforce page triggers, see our Developer Guide.

Select Source Object (child you are rolling up from) to Enable/Disable Real-time Updating.

  • The list will only be populated by objects that you have rollups created from. If you don’t see the object you want in the list, please verify that you have a rollup created that uses that object as a source.
  • Objects that already have a trigger deployed are signified with a checkmark.
  • On the right hand side, there are three columns: "Disable Realtime?", "Force Asynchronous?", and "Additional Settings"
  • Disable Realtime: Checking this setting for an object will cause Rollup Helper to immediately exit when the trigger for that object fires without processing any rollups. Please note that for realtime disablement functionality to work as expected, "Allow Disable Realtime By Script" will need to be checked in the Rollup Helper custom settings.
  • Force Asynchronous: Checking this setting for an object will cause Rollup Helper to shift all rollup updates for that object out of the immediate trigger context and into asynchronous (near real-time) processing. If asynchronous processing is enabled, expect Rollup Helper to take a minute or two to update records with rollup results after the rollup has been triggered.
  • Additional Settings: Clicking on the button will make a dropdown appear that lists additional settings for the object.
  • Disable Trigger?: Checking this setting for an object will cause Rollup Helper to disable the real-time trigger for the specified object. Any rollups using the specified object as the source must be run manually in order to process.
  • Enhanced Validation?: Checking this setting for an object will cause Rollup Helper to prevent records of the specified object type from being deleted if the deletion would cause a validation rule on a rollup's target object to fail. If deletion of a source object is prevented, an error will be logged and relevant rollups will not process.
  • Allow Child Save If Parent Save Fails?: Checking this setting for an object will allow source records to be saved even if a save on a target record fails from a rollup run. By default, Rollup Helper will not save source records if related target records fail to save. This setting may be used to ensure that records will not be rolled back or get lost. (For Example: Case records in Web-to-Case)

REMEMBER: Ensure at least one record exists that can be saved successfully for the object you want to deploy a trigger for. If no records for the object you want to deploy a trigger for exist, you may receive an error.

After selecting the object, you will be directed to a page to deploy the trigger, select the blue Deploy ’YourObjectName’__c Trigger button.

  • Do not leave the page while the trigger is deploying.
  • To check on the status of the deployment, click the link on the page. (Setup>Deploy>Deployment Status)
  • Once the trigger deploys, you will see a message at the top of the page indicating that the Trigger and Class have been installed.

Removing a Trigger: select the blue Remove ’YourObjectName’__c Trigger button. Do not leave the page while the trigger is being removed.

Real-Time Asynchronous Processing: Real time rollups have dynamic asynchronous processing built-in to avoid issues with Governor limits during processing. Contact us for assistance with disabling asynchronous processing or setting the usage percent of limits.

Browse and Deploy Use Cases

Allows you to view and deploy pre-built Rollup Helper use cases within a few clicks.

  • To begin, navigate to the Use Case Deployment tab or Browse Use Cases tile in Lightning.
  • The page will display a list of Rollup Helper use cases which can be deployed as rollups directly into your org.
    • Use Cases can be filtered by target object, which includes Account, Contact, and Campaign.
  • Once the desired use case is chosen, click Deploy next to the setting.
  • A custom field will then need to be created and used as the target field for the use case. 
  • Click Deploy Field.
    • Field Level Security settings will need to be adjusted for the target field in order to gain visibility to the field.
  • After deploying the field, click to deploy the setting. This will create a rollup and associated filter if applicable for that use case. 
  • You will then be redirected to the All Settings page and be able to see the use case deployed as a rollup setting.
    • Click “Back to Use Case Deployment” on the top right of the All Settings page to return to the Use Case Deployment page.

Custom settings

To view or manage your Rollup Helper Custom Settings in Classic go to: Setup>Develop>Custom Settings>Rollup Helper Settings>Manage. For Lightning, go to: Setup>Custom Settings>Rollup Helper Settings>Manage.

  • Disable Advanced Currency: If Advanced Currency Management is disabled in your organization, select this check box.
  • Enable Validation Rule Helper: To enable Rollup Helper Updates to be excluded from a Validation rule:
    • Select the checkbox.
    • Add ‘ &&   $Setup.rh2__PS_Settings__c.rh2__Run_Validation_Rule__c’  at the end of the contents of the Error Condition Formula section of a Validation Rule.
  • Limit Pre-Processing: Leave this unchecked if you only want rollups / records to be processed where a change was actually made to the source field. Removes non-essential processing such as filtering out fields that don’t need to be updated (which can help with Timeout issues).
  • Max Concurrent Batch Processes: Number of batches to initiate concurrently.
  • Maximum Jobs Added to the Queue: Number of queueable jobs to initiate concurrently.
  • Rollups Per Asynchronous Request: This setting modifies the number of rollups processed per asynchronous job request. Lowering this setting can greatly impact the number of query rows consumed per job, but will also in-turn likely greatly increase the number of queue items that need to be created to process all rollups.
  • Run Validation Rule: Leave this option checked.
  • Usage % of Limits: This setting is the package-specific governor limit threshold at which Rollup Helper will switch to dynamic asynchronous processing. If a rollup trigger is entered and the specified % of query rows or SOQL queries have already been used up prior to entering the Rollup Helper trigger, Rollup Helper will defer processing to an asynchronous context.
  • Validate Rollup Query: With the flag checked, when a rollup is edited, a query is run to determine validity. This option is on by default but can be turned off if it is causing timeout issues.
  • Process Queue Items Based on Modified By: This checkbox will cause Rollup Helper to only process queued asynchronous requests for the user that initiated the asynchronous request.
  • Realtime Enablement Opt Out: By default, Rollup Helper will inform you when you create a rollup from a new source object that does not yet have a trigger. If you would prefer not to receive this pop up, check this checkbox to opt out.
  • Usage Shared % of Limits: This setting is the transaction-wide governor limit threshold at which Rollup Helper will switch to dynamic asynchronous processing. If a rollup trigger is entered and the specified % of CPU time or heap size have already been used up prior to entering the Rollup Helper trigger, Rollup Helper will defer processing to an asynchronous context.
  • Max Exception Records: The maximum number of exception records that get created when errors are encountered during rollup runs. The default number is 10,000.
  • Disable Auto Changes to Running User: If checked, automatic processes will not update the running user for Rollup Helper.
  • Attempt to Update Converted Leads: When checked, Rollup Helper will attempt to update converted leads (the update may or may not succeed depending on this org’s configurations). This option is off by default. The converted leads are identified by the “isConverted” system field.
  • Data Load Batch Size: The Minimum batch size you typically use when loading data into your environment. Should be a value between 1 and 200. Used for dynamic asynchronous processing.
  • Enable Single Parent Processing: This will help to prevent record locks caused by multiple rollups attempting to update the same object at the same time.
  • Exception Lifespan: Allows for customization of how long (in days) Rollup Helper Exception records are kept before deletion. The default is 2 days.
  • Max Concurrent Future Processes: This is the number of Future method calls to initiate concurrently.
  • Record Scope: Maximum number of records to process asynchronously with Rollup Helper. This impacts the number of batch / future methods that will be called in order to process your entire set of records to complete an asynchronous transaction. Best to be a multiple of five.
  • Rollup Inactive Upon Creation: If this field is selected, all rollups will be defaulted to inactive when they are created.
  • Allow Disable Realtime By Script: If checked, the real-time disablement setting may be used to temporarily turn off rollups. Contact us for more details.
  • Static Asynchronous Processing Enabled?: This field should be checked if static asynchronous processing is enabled to prevent data load dynamic async from firing unnecessarily.
  • Use Dated Conversion Rates for Non Opps: When unchecked (by default), rollups will use the static rate for non-opp target objects: otherwise, use the dated currency rate that is decided by each child record’s date field (which is specified on a per-rollup basis under Advanced Settings).
  • Email to Send Exceptions: Rollup Helper will send an email once per day to this email address with any exceptions that have occurred within the hour. You may send exception emails to more than one email address. If the "Enable Hourly Exception Emails" custom setting is enabled, Rollup Helper will send an email once an hour to this email address with any exceptions that have occurred within the last hour.
  • Allow Validation Helper During Async: If this is unchecked, Validation Helper will be disabled during asynchronous processing. Uncheck if you are encountering record lock exceptions on the Rollup Helper settings object during asynchronous processing.
  • Run All Local Tests on Trigger Creation?: If this is unchecked, when deploying a realtime trigger Rollup Helper will configure the deployment to only run the test that is deployed with the trigger for code coverage. It is recommended to run all tests when deploying a Rollup Helper trigger.
  • Disable Currency Update Recalculation: If checked, Rollup Helper will not recalculate currency rollups after a change in a child record’s CurrencyIsoCode field.
  • All Usage % of Row Limits: Determines the percentage of query row limit usage Rollup Helper should use when retrieving child records. Lowering this setting may impact rollup accuracy, so it is recommended to keep this setting at or close to 100%.
  • Developer Exception Email Opt Out: If checked, Rollup Helper will not forward exception emails to our developers.
  • Enabled Hourly Exception Emails: If checked, the Rollup Helper Exception Monitor will send hourly emails containing exceptions generated within the last hour. If unchecked, the Rollup Helper Exception Monitor will send an email once daily containing exceptions generated within the last day.
  • Granular Scheduled Jobs: If checked, scheduled jobs can be run at 5 minute intervals (HH:00, HH:05, HH:10, etc.). If unchecked, scheduled jobs will only run at the top of the hour (HH:00).

Note: Please make sure the combined total of available concurrent future, batch, and queueable processes equals at least 30 jobs.

Rollup Helper Jobs

Scheduled Jobs

These jobs may be automatically or manually scheduled for regular execution in the background.

  • Rollup Helper Batch Agent - Hourly: This job will initiate any scheduled rollup jobs that need to be run.
  • Rollup Helper Schedule Monitor: This job will manage the Batch Size for any Rollup schedules that have "Run For All Records" checked.
  • Rollup Helper Exception Monitor: This job performs a few housekeeping tasks such as cleaning up old exception records (within the parameters of the defined Exception Lifespan) or alerting the users to any exceptions created.
  • Rollup Helper Record Scope Monitor: This job is responsible for calculating data skew in your org and adjusting object-specific record scopes accordingly.
  • Rollup Helper Retry: This job is configured from the Exceptions page and automatically retries rollups for records that have encountered exceptions.

Apex Jobs

These jobs are not scheduled and execute on an as-needed basis. They allow Rollup Helper to process settings asynchronously outside of an immediate real-time context. It is possible for rollups that are fired from a trigger, run manually, or executed from a schedule to use these jobs to process Rollup Helper settings.

  • PS_QueueableRollup: This is the primary job that processes your Rollup Helper settings.
  • PS_ScheduledDispatcher: This job is responsible for preparing and executing the PS_QueueableRollup job. It is normal for this job to run and abort itself.
  • PS_Schedule_Parent_Rollups: This job is responsible for scheduling and processing rollups in a dynamic asynchronous context. It may run when data loads exceeding the Data Load Batch Size custom setting are performed or when governor limits are near the maximum threshold, as defined by the Usage % of Limits and Usage Shared % of Limits custom settings.

Migrating Rollups

Where feasible, it is widely considered a best practice to test data processing systems in a non-production environment first before implementing and testing changes in production. Rollup Helper includes an Export Rollups page. This page allows you to move your rollups from one org to another. The most popular use case for the Export Rollups page is to move tested and functional rollups from a sandbox environment into a production environment, but you can transfer rollups between any two orgs using this functionality provided both the object(s) and field(s) exist in both environments.

  1. From the Rollup Helper Home page or Rollup Helper All Settings page, select Export Rollups.
  2. Either (A) select Export All or (B) select Export Selected to choose specific rollups.
  3. Scroll down and select Download, which creates a .csv file that can be imported into another org.
  4. To now use the downloaded .csv file, you will need to load that file into another salesforce org by loading its data into the Rollup Exports object. For assistance with using the free and native Data Import Wizard to map and import your rollups, see Import Rollups Using Data Import Wizard.

Contact us for assistance.

Last Modified By/Running User

Depending upon the mode in which Rollup Helper is running, records may be showing as Last Modified By Rollup Helper, or a User.

Manual Batch Run. Rollup Helper will update all records that it queries for the rollup as the User that ran the rollup.

Scheduled Batch Run. Rollup Helper will update all records that it queries for the rollup as the running user which is displayed at the bottom of the first column on the All Rollups page. By default, this is set to Rollup Helper.

To change the running user:

  1. Go to Setup>Scheduled Jobs and delete the Rollup Helper Batch Agent - Hourly job.
  2. Log in as the User you would like Rollup Helper to run as.
  3. On the All Rollups page, open the Settings pane and click the "Set Username as Running User" button..

Real-time. Rollup Helper will update records based on the User that modified the source record and triggered the rollup.

Asynchronous Real-Time. By default, Rollup Helper will update the record based on the User the batch agent has been logged under. If you would like Rollup Helper to update the records based on the User who last modified the record:

  1. Go to Setup>Custom Settings>Manage Rollup Helper Settings.
  2. Select the checkbox, “Update Queue Items Based on Modified By” and Save.

Rollup Auditing

In order to set up Rollup Auditing, follow these steps:

In Lightning:

  • Navigate to the 'Rollup Audit' object in Object Manager
  • Click 'Fields & Relationships'
  • Click 'Set History Tracking'
  • Check the box next to each field you would like to track history on, then click 'Save'
  • After saving history tracking, edit the Page Layout and add all fields you want to track by clicking Page Layouts > Rollup Audit Layout, then dragging the fields onto the page and clicking 'Save'
  • To add the Rollup Audit History to the page layout, select Related Lists, drag the 'Rollup Audit History' list onto the page, then click 'Save' to finish

In Classic:

  • Navigate to the Setup menu, then to the Objects page (Build > Create > Objects)
  • Click 'Rollup Audit'
  • Click 'Set History Tracking'
  • Check the box next to each field you would like to track history on, then click 'Save'
  • After saving history tracking, edit the Page Layout and add all fields you want to track by clicking Page Layouts > Rollup Audit Layout, then dragging the fields onto the page and clicking 'Save'
  • To add the Rollup Audit History to the page layout, select Related Lists, drag the 'Rollup Audit History' list onto the page, then click 'Save' to finish

We recommend enabling field tracking on the following fields:

  • Target Field (rh2__targetfield__c): The object/field combination in which rollup results are populated. For example: Account.Site
  • Source Field (rh2__sourceField__c): The field in which rollup results are sourced from. For example: Opportunity.Amount
  • Relationship Field (rh2__relationshipField__c): The Lookup Relationship field on the source object which points to the target object. For example: Opportunity.AccountId
  • Condition (rh2__condition__c): Name of the rollup's filter
  • Active (rh2__conditional__c): Determines if the rollup is active
  • Type (rh2__logic__c): Type of rollup (ex. MAX, MIN, SUM)

These fields' labels will appear in the list of fields to choose when enabling field tracking on the Rollup Audit object.

Best Practices

  • If you have a date filter on a rollup, be sure that it is scheduled based on the date criteria in addition to running in real-time. This will ensure that if a record isn’t modified by a User to trigger the rollup, the schedule will still keep the rollup up-to-date based on the date criteria.
  • When doing data loads, be sure that the custom setting “Data Load Batch Size” is in alignment with the number of records you typically load per batch.
  • When scheduling rollups:
    • Make sure that the schedule frequency is not shorter in duration than the estimated run time for the rollup. For example, if an estimated run time for a rollup is two hours, the schedule should not be more frequent than every three hours.
    • Optimally, rollups should be scheduled during non-peak business hours and not overlapping with other schedules that update the same parent object (but do not use the same filter) whenever possible.
    • Scheduled rollups will only update parent records for which the field value has actually changed.
  • When defining child filters on a rollup, referencing the target object through a cross-object filter will not exclude those target records from being rolled up to. In order to ensure those target records are not updated, consider using a parent filter to exclude those target records from getting updated.
  • If you have validation rules on objects that are the target object of a rollup, be sure to enable “Validation Helper” in Rollup Helper Custom Settings. Steps on how to enable this setting are available in the Custom Settings section of the guide.
  • In order to improve database request efficiency, consider filtering on an indexed field to ensure that the query is as selective as possible. For more information regarding SOQL query selectivity, see the in-app help page or contact us.
  • The efficiency of a Rollup Helper query will also be improved if any unnecessary sort orders are removed from filters.
  • The target field for the rollup must be writable to at least the System Admin profile. The field can be Read Only on the page layout as long as the back end is writable.
  • When rollups are processing in asynchronous real-time, make sure that the Custom Setting, “Rollups Per Asynchronous Request” is equal to the greatest number of rollups that share a filter within the org to ensure efficient processing.
  • When refreshing a Sandbox, be sure to follow the migration steps because filters are not automatically brought over.
  • When modifying the Custom Settings for Roller Helper batch job types (Maximum Jobs Added to the Queue, Max Concurrent Batch Processes, and Max Concurrent Future Processes), make sure that there are enough jobs between the three to appropriately handle the amount of requests coming in (usually between 30 - 50 for most orgs).
  • Set the “Email to Send Exceptions” in Custom Settings to your email in order to receive an email alert of any Rollup Helper exceptions occurring in the org.
  • If you are creating a new target field from within the app during rollup creation, be sure to go to Setup and set field level security and adjust page layouts.
  • If you change the API name and label to a picklist value that has a Rollup filter on it, you will need to go back to the filter and update the filter value.
  • You should not have Rollup Helper write to a field that is manually written to by users. This is because Rollup Helper will overwrite any user entered data with the Rollup result and the user entered data will be lost.

Additional Information

For information regarding Asynchronous Processing, please view our Asynchronous Framework whitepaper.